How to Connect Claude to Sendio (Step by Step)

In this article
Hey, it's Ricardo. One of the questions we get most often is how to plug Sendio into Claude so you can work with your outreach right from the place you already think and write. The good news is that it takes about a minute, and you do not need to touch any code. You generate a key on the Sendio side, add a connector on the Claude side, authorize it once, and you are done. Let me walk you through it.
Watch the full walkthrough (about one minute):
If you would rather read than watch, or you want a reference to come back to, here is the whole thing in writing.
What you will need
There is almost nothing to prepare, but two things make this smooth.
First, a Sendio account you can log into, with access to Settings. Second, Claude open, either in the desktop app or the web app, on a plan that supports custom connectors. That is it. Keep both open in separate tabs and you will move through this in one sitting.
Part one: generate your API key in Sendio
This is the piece that lets Claude talk to your Sendio account securely.
- In Sendio, go to Settings.
- Open the MCP tab.
- Click Create key.
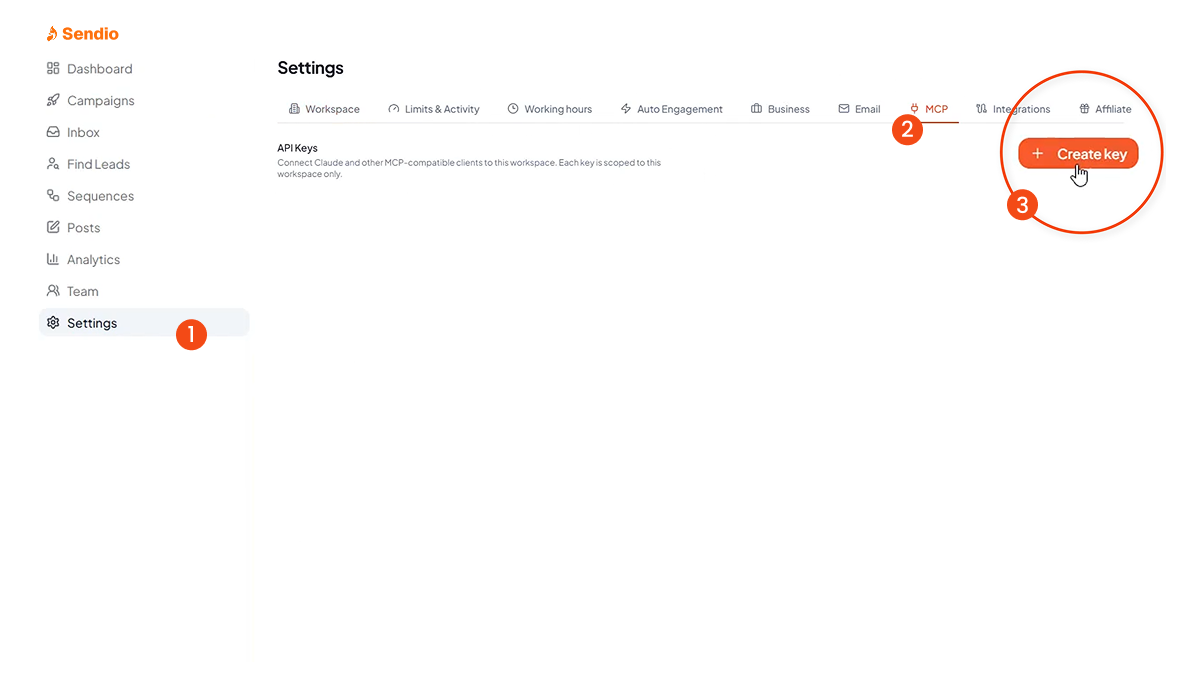
- Give the key a name so you remember what it is for. I name mine after the tool I am connecting, so in this case I just call it Claude. Naming keys per tool matters later, because if you ever want to cut one off, you know exactly which one to revoke without breaking anything else.
- Create the key. Sendio will show you the connection instructions and a link.
- Copy that link. This is the URL you are about to paste into Claude.
Keep this tab open for a second in case you need to copy the link again.
Part two: add the connector in Claude
Now you tell Claude where to find Sendio.
- In Claude, click Customize.
- Click Connectors.
- Hit the plus icon, then choose Add custom connector.
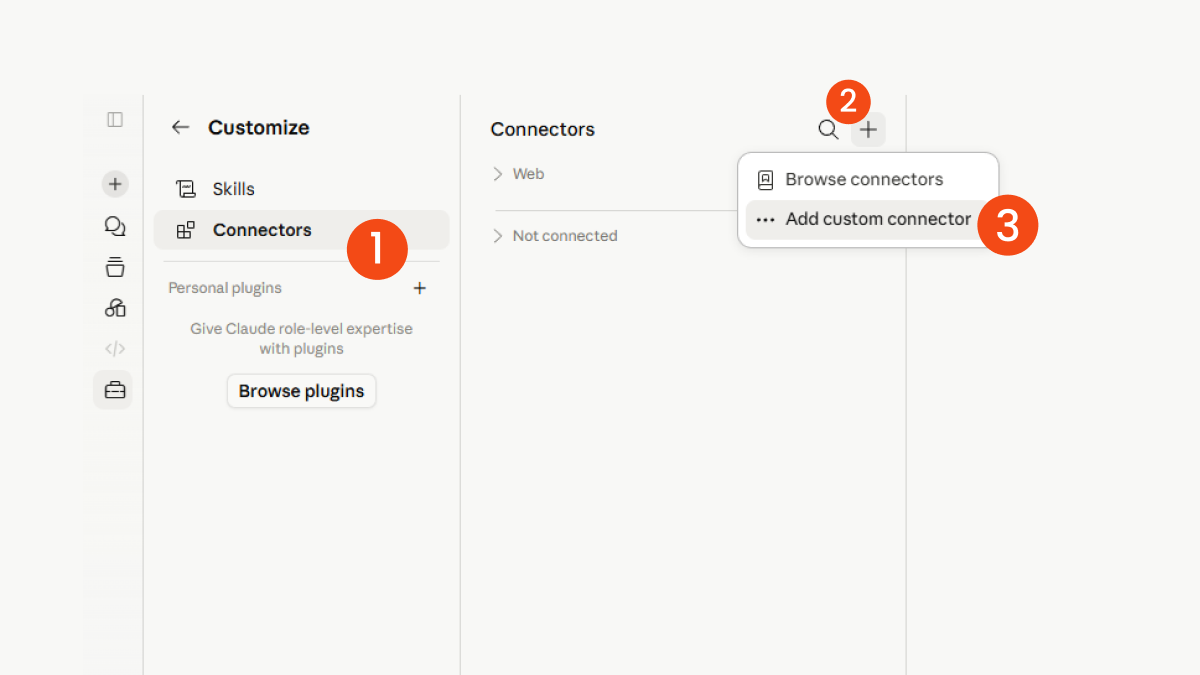
- Give it a name. I just call it Sendio so it is obvious in the list later.
- Paste the URL you copied from Sendio into the connector field.
- Hit Add.
At this point the connector exists in Claude, but it is not live yet. You will see that it shows as not connected. That is expected. One more step.
Part three: authorize and confirm
This is the handshake that actually turns it on.
- On the connector you just added, hit Connect.
- Claude will redirect you to your browser to authorize the connection.
- In the browser, authorize it. This is you confirming that yes, this Claude account is allowed to talk to this Sendio account.
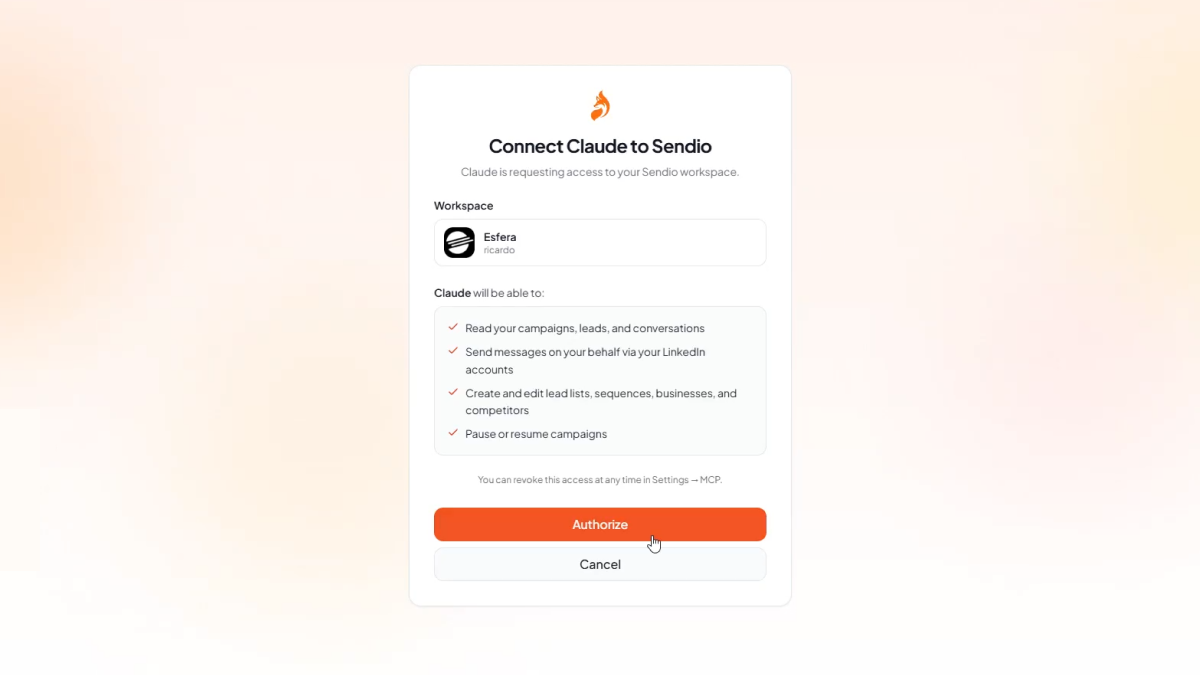
- Once you authorize, it flips to connected.
Now reopen Claude and you will see the Sendio connection sitting there, ready. That is the whole setup. From here, you can start using it.
What you can do once it is connected
The point of connecting the two is to stop switching tabs to get answers about your outreach. Once the connector is live, you can ask Claude about what is happening in Sendio in plain language, right inside a conversation. For example, you might ask it to summarize what is in your inbox, to help you think through a reply, or to pull together what is going on across your outreach so you can decide where to spend your attention. Exactly what you can ask depends on what the connector exposes, and we keep adding to that, so it is worth poking around once you are in.
The real benefit is the context. Claude is already where a lot of people draft, think, and plan. Bringing your Sendio activity into that same space means you are reasoning about your pipeline in the place you already work, instead of copying things back and forth.
Keep your key safe
One quick bit of housekeeping, because it matters. Treat the API key like a password. Anyone who has it can connect to your account, so do not paste it into a public chat, a shared doc, or anywhere you would not put a password. This is also why I told you to name the key after the tool. If you ever connect several things and later want to shut one of them off, a clearly named key lets you revoke just that one from the MCP tab in Sendio, without disturbing the others. Create one key per tool, name it clearly, and you stay in control.
If something does not connect
If the connector shows as not connected after you added it, that is usually normal until you hit Connect and authorize in the browser, so finish that step first. If it still will not connect, the most common cause is a link that did not copy cleanly, so go back to the Sendio MCP tab, copy the URL again, and paste it fresh. And make sure you authorized in the browser window that opened, since that is the step that completes the handshake. If you are still stuck after that, reach out to us and we will get you sorted.
That is really all there is to it. Generate the key in Sendio, add the connector in Claude, authorize once, and your outreach lives right next to the place you already think and write. It is one of those small setups that quietly saves you a hundred little context switches a week.